When you pack for a hike that lasts two days, you need to focus on the basics. Bring shelter, a sleep system, food, water, clothing layers, first aid, navigation tools, and emergency gear. Many hikers forget things like extra socks, a lighter, or even a phone charger. You should also remember these often-missed items:
Emergency shelter
Extra food and water
Repair kit and tools
Pack for a hike with only what you need. Stay organized, keep your load light, and watch for changing weather. If you pack for a hike with care, you set yourself up for a safe and fun trip. Always check your list before you pack for a hike, so you do not miss anything important. Packing smart helps you enjoy every step when you pack for a hike.
Key Takeaways
Pack only the essentials for a 2-day hike. Focus on shelter, sleep system, food, water, clothing layers, first aid, navigation tools, and emergency gear.
Choose lightweight gear to reduce fatigue. Lighter tents and sleeping bags help you move faster and stay comfortable on the trail.
Layer your clothing to adapt to changing weather. Use moisture-wicking base layers, insulating mid-layers, and waterproof outer layers to stay dry and warm.
Stay organized when packing your backpack. Place heavier items close to your back and keep essentials like snacks and rain gear easily accessible.
Always check your packing list before you leave. This helps ensure you don’t forget important items and sets you up for a safe and enjoyable hike.
Essential Packing List

When you start building your packing list for a 2-day hike, focus on the main gear pieces that keep you safe, comfortable, and ready for anything the trail throws at you. Let’s break down what you need for shelter, sleep, clothing, and footwear.
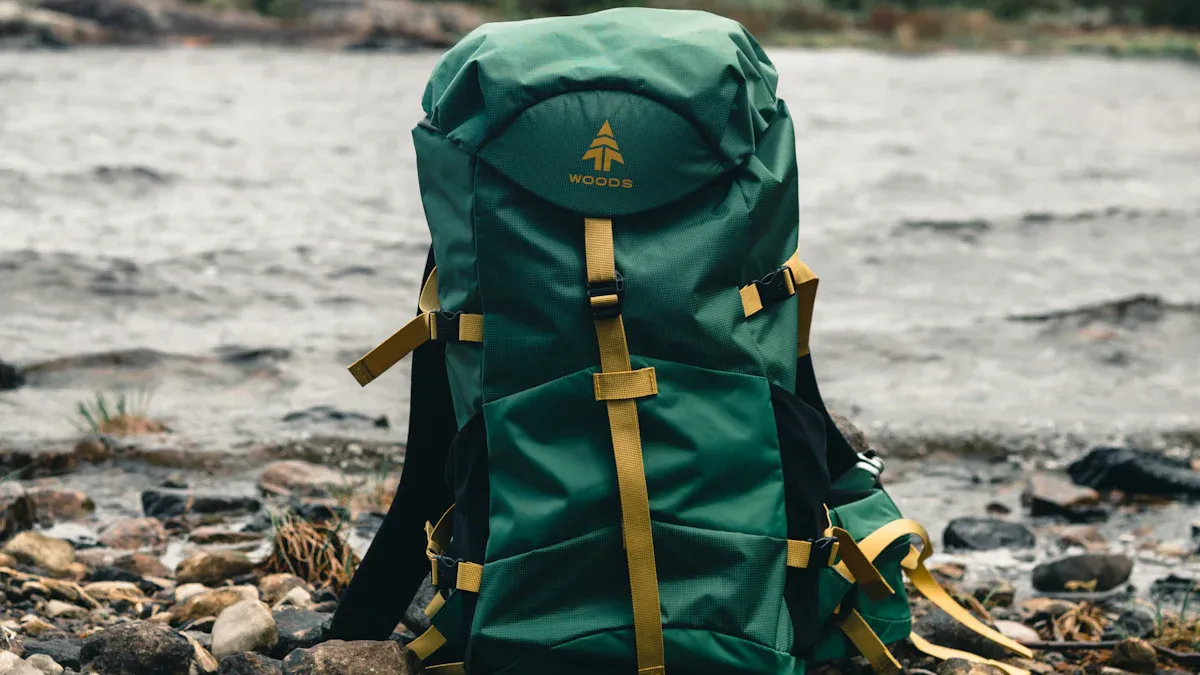
Shelter & Sleep
You need a reliable shelter and a good sleep system for a restful night outdoors. Most hikers choose a lightweight tent, but you can also use a tarp or bivy sack if you want to save weight. Your sleeping bag and sleeping pad are just as important. They keep you warm and cushion you from the ground.
Tip: Lighter gear means less fatigue and more energy for hiking. Ultralight tents and sleeping bags can make a big difference.
Here’s a quick look at how lighter gear impacts your pack weight:
Item | Initial Weight | Current Weight | Weight Savings |
|---|---|---|---|
Sleeping System | 36.2 ounces | 31.8 ounces | 4.4 ounces |
Shelter | 99 ounces | 39 ounces | 60 ounces |
Total Weight Savings | – | – | 5.15 lbs |
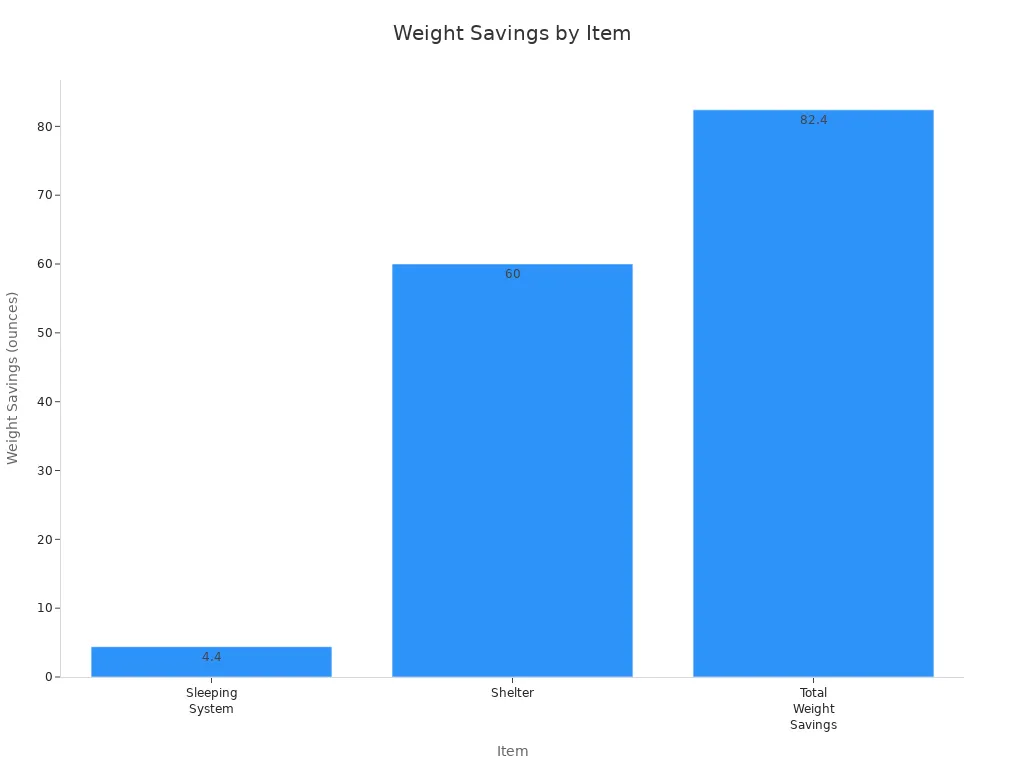
Choosing lighter main gear pieces helps you move faster and reduces the risk of injury. Always check the weather and terrain before you pack. If you expect rain or cold, bring a tent with a rainfly and a sleeping bag rated for low temperatures. For dry, warm nights, you can go with lighter options.
Clothing Layers
Packing the right clothing layers is key for comfort and safety. Weather can change fast, so you need to be ready for sun, wind, or rain. The best approach is to use three basic layers:
Base Layer: Wear this against your skin. Choose moisture-wicking materials like polyester or wool. These fabrics pull sweat away and help you stay dry.
Mid Layer: This layer keeps you warm. Fleece or a light insulated jacket works well. You can add or remove mid layers as the temperature changes.
Outer Layer: Protect yourself from wind and rain with a waterproof jacket or a puffy coat. A vest adds extra warmth if you need it.
Note: Avoid cotton for essential hiking clothing. Cotton holds moisture and can make you cold, even in mild weather.
Here’s a quick guide to materials for essential hiking clothing:
Material | Moisture-Wicking | Insulation | Drying Time |
|---|---|---|---|
Polyester | Excellent | Moderate | Fast |
Wool | Moderate | Excellent | Slow |
You can adjust your packing list based on the forecast. For cold weather, bring midweight long underwear and a synthetic jacket. For hot days, pack a short-sleeve tee and lightweight pants. Always bring a rain jacket, even if the forecast looks clear.
Footwear
Your feet take you everywhere, so pick sturdy footwear that matches the trail. Hiking boots with ankle support and stiff soles help you handle rocky or uneven ground. Look for boots with midsoles made of EVA or polyurethane for extra comfort and support.
Stiff boots give you stability on rough trails.
Ankle support helps prevent injuries.
Choose boots designed to protect your feet from sharp rocks and roots.
Here’s a quick comparison of hiking boot types:
Boot Type | Best Uses |
|---|---|
Lightweight | Day hikes |
Midweight | Day hikes, backpacking |
Heavyweight | Day hikes, backpacking, light technical terrain |
Leather boots last a long time but take longer to break in. Synthetic boots dry faster and feel lighter, but they may not last as long. For a 2-day hike, most people do well with midweight boots. They balance comfort, support, and durability.
Tip: Try on boots with the socks you plan to wear. Walk around the store to check for comfort and fit.
When you build your packing list, remember that the main gear pieces—shelter, sleep system, clothing, and footwear—set the foundation for a safe and enjoyable trip. Always pack for the weather and the terrain you expect. If you keep your load light and your gear organized, you’ll have more fun and less stress on the trail.
Food & Hydration
Meals & Snacks
Packing food for a 2-day hike means choosing meals and snacks that are easy to carry, quick to eat, and packed with energy. You want options that keep you fueled and satisfied without weighing down your backpack. Here’s what you can bring:
Dried fruit like raisins, mango slices, or pineapple
Fruit bars and homemade fruit leathers
Granola bars with nuts or seeds
Trail mix with nuts, seeds, and dried fruit
Beef jerky or vegan jerky
Whole grain bagels with hummus or peanut butter
Muffins, breakfast cookies, or energy balls
Low-fiber crackers and cheese
Sports gels, fruit gummies, or candy for quick energy
Tip: Pack snacks in resealable, odor-proof bags to keep them fresh and avoid attracting wildlife. Always store food away from your sleeping area.
Water Storage
Water is one of the most important things to pack. You need enough to stay hydrated, especially if you hike in hot weather or at high altitude. Most hikers carry at least 2-3 liters of water per day. Drink about half a liter every hour during moderate activity. If you hike hard or sweat a lot, increase your intake to one liter per hour.
You can use water bottles or hydration bladders. Always bring a way to purify water from streams or lakes. Popular options include:
Aquamira drops or tablets
Sawyer Squeeze filter
Katadyn BeFree filter
Boiling water (if you have time and fuel)
Iodine or chlorine tablets
UV light purifiers
Note: Filter or purify all water to avoid illness. Set reminders to sip water every 15-20 minutes.
Cooking Gear
For a short hike, you want cooking gear that is light and compact. Many hikers choose gear that fits inside a small pot or mug. Here are some top picks:
Cooking Gear | Weight (ounces) | Features |
|---|---|---|
Snow Peak Ti-Mini Solo | 0.4 | Ultra-packable, titanium |
Snow Peak Trek 700 Titanium | 0.3 | Small, lightweight |
MSR Trail Mini Duo | 0.7 | Fits fuel can and stove inside |
GSI Glacier 1-Person | Compact | Holds canister and stove |
GSI Pinnacle Dualist HS | Lightweight | Designed for backpacking |
Pack a small stove, fuel canister, and a spork. Always cook away from your tent and keep your camp clean to prevent wildlife encounters.
Safety & Navigation
First Aid Kit
You need a first aid kit that covers the most common hiking injuries. Pack supplies for cuts, scrapes, blisters, and sprains. Include adhesive bandages, sterile gauze pads, and antiseptic wipes. Toss in pain relievers, antihistamines, and antacids. Tweezers and scissors help with wound care. Moleskin protects against blisters. You might face dehydration, heat rash, or a twisted ankle. Carry enough supplies to treat these problems. Choose a kit that fits your group size and trip length. Keep it light, but make sure it has what you need.
Tip: Check your kit before every hike. Replace anything you use or anything that expires.
Emergency Gear
You want gear that keeps you safe if something goes wrong. Pack a headlamp with extra batteries. Bring a whistle to signal for help. Carry a firestarter, like matches or a lighter, plus some tinder. A knife or multi-tool helps with repairs and emergencies. Slip an emergency blanket or bivy sack into your pack. These items protect you from cold and rain. If you hike in remote areas, consider a personal locator beacon (PLB) or satellite messenger. These devices send distress signals if you need rescue.
Here’s a quick list of emergency gear for a 2-day hike:
Headlamp or flashlight
Whistle
Firestarter (matches, lighter, tinder)
Knife or multi-tool
Emergency blanket or bivy sack
Personal locator beacon (PLB) or satellite messenger (for remote areas)
Note: Pack extra food, water, and clothing beyond your minimum needs. A trash bag can double as emergency shelter or rain protection.
Navigation Tools
Navigation tools help you stay on track and avoid getting lost. Always pack a map and compass. GPS devices and apps like Gaia GPS work well, but don’t rely on them alone. Batteries can die, and signals can drop. Practice using your map and compass before your trip. Check your position often. Update your mental map as you hike. Mark landmarks and trail junctions. Use a current map and double-check your direction after each turn.
Here’s what to pack for navigation:
Map (up-to-date)
Compass
GPS device or app (as backup)
Personal locator beacon or satellite messenger (optional for remote hikes)
Tip: Carry sun protection, like sunglasses and sunscreen, to help you read maps and screens in bright light.
Staying safe means packing the right gear and knowing how to use it. With a solid first aid kit, emergency gear, and reliable navigation tools, you’re ready for whatever the trail brings.
How to Pack for a Hike
Backpack Organization
Packing your backpack the right way makes hiking easier and keeps you comfortable. You want to keep the center of mass high and close to your back. This helps you balance and reduces strain on your shoulders. Start by placing your sleeping bag and other soft items at the bottom. These act as a cushion and keep hard gear from poking you.
Put heavier items, like your food stash or stove, in the middle and close to your spine. This keeps the weight centered and helps you move smoothly. Balance the weight on both sides. If one side feels heavier, repack during breaks. Use side pouches for water bottles and tools you need often.
Tip: Tighten the compression straps after packing. This brings the load closer to your body and keeps everything stable.
Here’s a quick guide for packing order:
Section | What to Pack |
|---|---|
Bottom | Sleeping bag, clothes |
Middle | Food, stove, water reservoir |
Top | Tent, rainfly, bear vault |
Side Pouches | Water, tools, snacks |
If you pack unevenly, your backpack might pull backward or to one side. This makes hiking harder and can cause fatigue, especially on rough trails.
Rain Gear & Extras
You want to keep rain gear and snacks easy to reach. Pack your rain jacket or poncho in a top pocket or a side pouch. This way, you can grab it fast if the weather changes. Don’t bury it under other gear. Use a designated pocket for rain gear so you don’t have to remove your backpack.
Pack snacks in resealable plastic or waterproof bags. Place them in outer pockets or hip belt pouches. This keeps them dry and lets you eat on the move. Separate your food items—breakfast, lunch, dinner, and snacks—for quick access. Use a water filter bottle for fast hydration without unpacking.
Note: Stay mindful of hydration and nutrition, especially when it rains. Eat and drink before you feel thirsty or hungry.
Packing smart means you spend less time searching for gear and more time enjoying the trail. Keep essentials handy, and you’ll be ready for anything nature throws your way.
Packing smart for a 2-day hike means you bring only what you need, stay organized, and prepare for changing weather. Use your packing list as a checklist before you leave. Good preparation keeps you safe and helps you enjoy every step.
The decisions you make before your hike can prevent danger. Research your route and know your limits.
Layer your clothing for different weather.
Pick versatile and packable items like raincoats and jackets.
Adapt your list for your own needs and the forecast. Careful planning leads to a better adventure.
FAQ
What should you always pack for a 2-day hiking or trekking trip?
You should always pack a tent or shelter, sleeping bag, sleeping pad, food, water, extra clothing, first aid kit, navigation tools, and emergency gear. These items help you stay safe and comfortable during hiking or trekking adventures.
What food works best for hiking and trekking?
Choose lightweight, high-energy foods for hiking and trekking. Pack trail mix, dried fruit, jerky, nut butter, granola bars, and instant meals. These foods give you energy and are easy to carry. Always bring extra snacks in case your hiking or trekking trip takes longer than planned.
What clothing should you wear for hiking or trekking?
Wear moisture-wicking base layers, an insulating mid-layer, and a waterproof outer layer. Choose hiking or trekking pants and sturdy boots. Bring extra socks and a hat. Avoid cotton. Dress in layers so you can adjust as the weather changes during hiking or trekking.
What gear should you avoid bringing on a hiking or trekking trip?
Skip heavy or bulky items that you do not need for hiking or trekking. Leave behind extra shoes, large cookware, and unnecessary electronics. Focus on lightweight, multi-use gear. This keeps your hiking or trekking backpack light and easy to carry.
What should you do if you get lost while hiking or trekking?
Stay calm and stop moving. Use your map, compass, or GPS to find your location. Signal for help with a whistle or bright clothing. If you cannot find the trail, stay put and wait for help. Always tell someone your hiking or trekking plans before you leave.